
 I got the another PM from one of my fellow members over in the WatchGeeks.net forum. Being the cool guy that I am, I once again decided to place the contents here for all of you to enjoy, praise, extol the virtues of ... you know ... Okay, fine. You caught me. I'll just be happy if you read the friggin' thing.
So the PM goes like this:
"I read your comment about chromatic aberration and I have another question about the same image. What adjustments would have to be made to have more of the image in focus? Would the f-stop needed to be adjusted? Longer lens further away from the subject? I have tried similar shots with similar results. If you can help me, that would be wonderful!"- Narrow Focus
Well, you are right on both counts as to what may help. First, I want to state what chromatic aberration is for those who may not know.
CA is usually seen at very bright portions of an images next to darker ones and is due in part to the internal glass (elements) of your lens. Here is a great article that explains it very well in addition to one way to remove it in photoshop: CORRECTING CHROMATIC ABERRATIONS
THE FOCUS FACTOR
NOTE: All the info below is based off of a D-SLR camera with interchangeable lenses, since it is what I have, but the idea will work with a P&S with macro capabilities as well.
The amount of the image that is in focus is commonly referred to as it's Depth of Field.
If your image has a shallow/short DoF, then there is only a small portion of that image that is sharp and clear.
If your image has a deep/long DoF, then there is good portion of that image that is sharp(er) and clear(er).
You can have it both ways, just not both at the same time.
Here is the thing about DoF - know what it is that you want going in to the shot so that you can make the best use of the DoF you have available to you.
As you have noticed, deep DoF images are more prevalent in commercial use where the entire subject needs to be in focus in order to show detail. Buildings, clothes, cars, landscapes, items, etc. Shallow DoF lends itself far more to the artistic side of photography and is used to emphasize a certain area with sharp detail, leaving the rest in a softer focus.
NOTE: there is a DIRECT relation between light amount, f-stop and shutter time. If you have a constant light source and maintain a set ISO (film speed), every time you change your f-stop, your shutter speed with change as well. Smaller apertures mean longer shutter times. Longer shutter times means more chance for blur to occur from camera shake. Bear this in mind when shooting at smaller f-stops. It is here that a trigger release and shutter lock-up starts to come in very handy.
Here is how the distance to your subject relates to your DoF:
As a general rule the further you are from an object, the larger DoF area you will have. The closer, the narrower it becomes. This is also true with the length of your lens. The shorter/wider the lens is in mm's, the larger the DoF. The longer the lens, the shorter the DoF. For example a 10mm lens has almost no DoF wide open (or it would be better measured in feet) while a 100mm lens like mine, can have a DoF as shallow as 0.25-0.5mm.
In the shot below taken with my 100mm Tokina macro at f/8 at its minimum focus distance of 11.8" (30cm), the sharp DoF was about 0.75mm - after that you can start to see the blur increase.
Note the two 45's.
On that watch, their distance in height from one another is about 1.25mm, yet the 45 on the bezel is already starting to blur ... at f/8. At f/2.8 it was completely blurry.

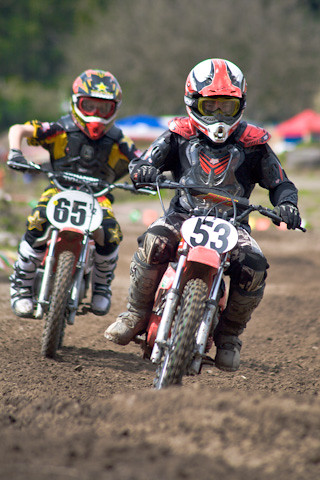
Here, I used my Canon 70-300 IS USM at f/5.6 at 300mm from about 50 feet. With this lens at its max zoom, you can see that the usable DoF is around 6-10 feet while the sharp DoF is about 1.5 feet - and - it was shot at f/5.6 not f/8 as above. That is because of the length of the lens and the distance to the subject.
The rider was brought 'closer' with the zoom, thus separating him from the background and shortening the DoF.
Ok. So here is how to use lens length in conjunction with your f-stop:The interesting thing is: both of these images were shot completely different yet have shallow DoF. Isn't it great?

I hope that has, is some way, answered your question and will aid you in taking better images of your watches in to the future ... and beyond!
If you have say a 100mm macro lens, you are able to get fairly close to your subject - that means your usable DoF will be very small. Understanding that, if you want more of your watch to be in focus, say somewhere around 4-6mm, you will have to increase your f-stop to at least f/16 or higher.
What you need to do is experiment with your cameras aperture settings.
Start by setting your camera to it's version of Aperture Priority. This will let you control the size of the cameras aperture (measured in f-stops) and forcing the camera to take care of the rest of the settings based off of the aperture you choose.
The first thing to do is start off by looking for your lens's 'sweet spot' - the smallest aperture you can use while still retaining perfect clarity at the point where you focused. Any aperture above that sweet spot may bring more of the background in to focus but at the cost of sharpness of the focal area.
Once you have found it, this will be the f-stop that you do not want to pass unless loosing sharpness at your focus point becomes less of an issue. Say, when shooting landscapes at distance.
Now, all you need do is shoot your subject at all the aperture settings (up to that sweet spot). Start at the larges (smallest number) and go one step at a time.
For mine that would be: 2.8, 3.2, 3.5, 4.0, 4.5, 5.0, 5.6, 6.3, 7.1 8.0, 9.0, 10, 11, 13, 14 & 16.
When done, pick the one(s) you like best or that fit your need. After a while, you will learn what f-stop work best and not have to shoot at all of them, just a couple up and down. This often called AEB bracketing (auto exposure), and it is part of most DSLR's custom function options.
Ok. If you have a longer lens, say the awesome Canon 180mm macro. You will now be farther away from your subject, increasing your sharp DoF area some. You may go from 4-6mm at f/16 to 6-10mm at f/8.
A P&S camera falls in to the position somewhere between both of these examples.
Usually the macro function only works at close range, limiting your DoF to the short end. You might then choose to zoom in and increase your DoF some, but at the (usual) cost of image clarity and sharpness. Due in part to the actual distance, lens quality and possible camera shake.
 FUNNY
FUNNY  TECH
TECH  MEDIA
MEDIA  MUSIC
MUSIC  RANT
RANT 


No comments:
Post a Comment